Thursday, June 23, 2011

So you want to buy a pinball machine...

Pinball machines (or “pins”, as we collectors call them) can be a lot of fun to own. They hold their value pretty well, and no gameroom is complete without one. If you buy a used pin at a fair price and take care of it, you can expect to get most of your money back when you sell it later. Compared to a boat, it’s a good investment - but don’t expect it to go up in value. After all, you’re buying it to have fun, right?

What era should I look for?

This is the first question you’ll want to answer. Which decade is right for you? These are the things that should factor into your decision...

Cost
Here are some very rough guidelines about what to expect:
  • $400-1200 for an “EM” pin (1978 and older, no electronics)
  • $800-2000 for a game from the 80’s
  • $2000-$3000 for a typical game from the 90's
  • $3000-5000 for a used game less than 5 years old
  • $5000-$8000 for an “A” title, like Twilight Zone or Attack From Mars
  • $5000 (shipped) for a brand new "Pro" game from Stern Pinball
Complexity (“Depth”)
Do you want a game with simple goals, that you and your guests can learn in a few minutes? Or do you want a game that's "deep", so you know you won’t get bored with? A lot of games from the late 80’s have simple goals, but are still a lot of fun to play. If you’re only buying one game, look for one with ramps and multiball.

Nostalgia and Artwork
Do you want to play something you remember playing as a kid? If not, you’ll probably want to stick to the newer games. On the other hand, you may want something that looks beautiful when you’re not playing it. The older games had great original artwork, while most newer games use a license (like “Transformers” or “Iron Man"). Browse IPDB, you may be surprised at what was made into a game.

Maintainability
Games from 1990 and later have more parts, but they tend to break down less often, and replacement parts are easier to find. “EM” pins are easy to work on once you learn how, but it can be hard to learn, and they have more mechanical parts. I love games from the 1980’s, but they have an Achilles’ Heel: connectors. Many connectors from that era were poorly designed, and the game may be unreliable until the connectors are rebuilt. This isn’t hard to do, but it’s tedious.

Investment Value
In the 90’s, Baby Boomers were buying games from the 70’s and 80’s like crazy. But as these older guys have started retiring and moving into smaller homes, these games have dropped in value. Right now, games from the 90’s are doing well, because that generation is buying. And so it goes -- as the buyers “age out” of the collector market, their games will drop in value. Don't worry too much about value. Take care of your pin and enjoy it! I've sold about 50 games over my 18 years of collecting, and I've only lost about $2000 total.

Summary
For a first-time buyer with kids, I’d recommend a game with a “DMD” (dot matrix display) from 1990 or later. Look for one with a rating of at least 7/10 on IPDB or Pinside; this gives you the best chance of recovering your investment if you want to sell it later. But if you find a game that you love and everyone else seems to hate, don’t be afraid to buy it. Just know that it may take a little longer to sell it.

Great, where can I buy one?

In my order of preference:
  • Pinball Bash - group of collectors mostly from the Southeast.
  • Pinside - the new RGP.
  • Mr Pinball - by collectors, for collectors.
  • KLOV forums - arcade group with some pins for sale.
  • Craigslist - look out for scams, and don’t bother with broken games.
  • eBay - avoid retail sellers and anyone with less than 98% feedback.
How can I avoid overpaying?

Before you begin shopping around for a pin, get the Mr. Pinball price guide. As the guide says, prices will vary by condition. It’s worth paying $200-400 more for a game that’s in nice shape, works 100% and has already been restored.

Highly collectible games may drop in value as the pinball collector community moves on to the next “it” game. There are a lot of great “B” titles for less money, that hold up well over the long haul. Some bad movies were made into really fun games - “Congo”, “The Shadow” and “Stargate” are a few examples.

Don’t be afraid to negotiate. If you find a game that’s been listed for a few months, ask them to knock the price down a bit. If someone is asking $1000 more than the game is worth, don’t bother with them - they’re retail sellers waiting for a sucker.

It broke, now what?

If you like to tinker, head on over to http://www.pinwiki.com. If you prefer to leave it to the pros, ask for a repair person on your local forum.

More Links

Monday, February 7, 2011

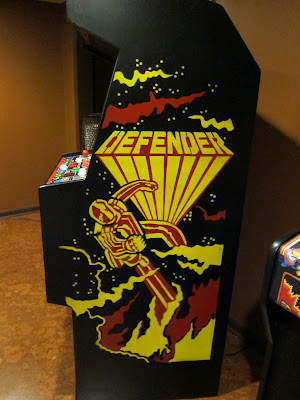
Defender for sale!

My Multi-Williams is finally done, so I've decided to sell my minty Defender. Check out the pictures, read the summary and let me know if you're interested!

*** UPDATE - this is sold


Condition:
  • Original cabinet with no moisture damage (new back)
  • Kortek KT2001SF monitor, just recapped this month and perfectly adjusted
  • Great original artwork with just a few dings
  • New leaf switch buttons, new marquee
The monitor is beautiful. I took over 20 pictures and I'm not happy with any of them. I'll try to post a video I took of the attract sequence, which came out much better.


Price is $800 (firm). I think it would be hard to find a nicer plug-and-play Defender. I'm not in a hurry to sell it, and I'd like to see it go to a good home. I'm also happy to talk trades for color vector games or parts. 

Thanks for reading.

Wednesday, December 22, 2010

Multi-Williams CP, continued

I made more progress on my CP today. It took me about 30 minutes to grind down the shoulders of my leaf buttons so they'd fit. I used this Dremel bit:
I wanted to be able to screw leaf switches into wood, so I riffed on a fellow KLOVer's idea. I made a paper template and drilled out a 22"x5-1/2" piece of wood, 1/2" thick. I used a 1/2" spade bit for the joystick lugs, a 1-1/4" hole saw for the buttons, and a 2" hole saw for the joystick itself. Pictures are better than words here:
The small rubbers were great; they hold the wood tight once the WICO joysticks are installed, and they leave just the right amount of room to install the dust cover under the CP:
I checked the clearance with a leaf switch I pulled from my Joust CP, and it was perfect. Unfortunately I forgot to order leaf switches to go with these buttons, so I won't be able to finish this today. 


There is one problem with my wood panel: the holes are too large to hold the PAL nuts. Fortunately the buttons are so tight they don't budge anyway, so this was a non-issue. If I did this again I'd drill a smaller hole, and just use a Forstner bit to cut a shallow hole to clear the button shoulders.

Tuesday, December 7, 2010

Multi-Williams Control Panel (part 1)

 Rustoleum Metal Primer

 Rustoleum Flat Black enamel

Cleaned with 70% iso alcohol

 Tip from fellow KLOV'er: position the top using a few buttons. 
This worked great! 

 Bottom is finished

 Time to remove the backing and do the top

 Overlay installation is done!

 I painted the hinge and bolts flat black. 
Some of these go to another game.

 The catches needed to be moved forward 3/4", to compensate for the reduced thickness of the control panel. 

 Hinge is installed. The square part of the carriage bolts didn't fit through the holes in the CP, so the bolts stick out a tiny bit.

Removing staples from the gasket that goes between the metal and the glass bezel. I used double-sided tape to attach the gasket to the control panel, worked fine. I need to buy some thin weatherseal to attach to the other side.

Installed. The reason that the right joystick isn't installed is that its top leaf switch butts up against the bezel holder. I'll need to cut out a notch in the bezel holder.

Close-up of the plastic gasket (reused from the old CP).

That's it for now. In part 2, I'll install the rest of the hardware and connect the JAMMA harness.

Monday, December 6, 2010

Dynamo CP: mystery game

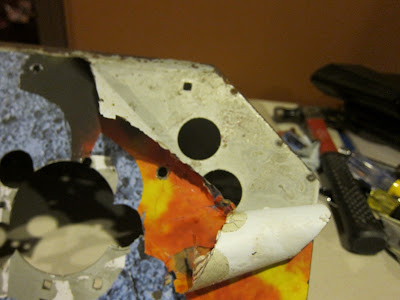
What was this before it became a Maximum Force? Either someone went crazy with a metal punch, or this control panel has led at least 3 lives. I'll let the pictures tell the story...


It took my about an hour to get the old overlay off, using a heat gun. Lots of sharp edges, no blood - I'd call that a success.

[UPDATE] A fellow KLOV'er posted a link to this pic, which shows the original CP (on the right):

I counted, and there were 11 holes added. Having this original picture really helps me with my layout planning.

Sunday, December 5, 2010

Monitor Cleaning / Rejuvenation

I found some time to use my new B&K 467 CRT Restorer/Analyzer today. In fact, I did 5 monitors. The steps for setting it up and using it were really straightforward, and it was even easier for me because every monitor used the same CR23 adapter, and a 6.3V heater setting. I started with this tube:
This is from a monitor that stopped working after I did a cap kit on the chassis. The plastic insulator was burned and brittle, and literally fell apart when I pulled the neckboard off  to cap the chassis. When I initially hooked up the BK467, all three guns were in the red. This was one of two tubes that required the draconian REJUVENATE function. After rejuvenating all three guns,  readings were all midway into the green, and colors were tracking well! I was happy about this because the screen has almost no burn. It will make a nice monitor for someone.

Here's what the BK467 looks like when it's set up:


I think this is the best $90 I've spent on anything related to the hobby. It's already paid for itself with the one tube it brought back from the dead. 

Tips:
  1. Rejuvenation does reduce the life span of the CRT! So unless emission readings are in the red, use the CLEAN/BALANCE setting instead. 
  2. Rejuvenation can create a short! I experienced this with my Defender monitor. Fortunately the "REMOVE SHORTS" function fixed it (after about 4 presses). This was a little nerve-racking, but it all came out OK in the end.
  3. There's nothing wrong with a tracking error, if the gun that's low is still in the yellow! This can be fixed by adjusting the OFFSET/DRIVE settings for that color on the neckboard.
In summary: "Better" is the enemy of "Good". The CLEAN/BALANCE function is as safe as vitamin C, but think twice before using REJUVENATE. 

Dynamo cab part 2 - Bondo

I spent some more time on my Dynamo HS5 cabinet recently. After protecting the newly laminated back with some masking tape and craft paper, I glued and screwed it into place:


I counter-sunk the wood screws, but one of the nice things about Formica (especially the thicker "grade 10" version) is that it hides everything. I don't think I'll be using Gorilla Glue anymore, though. It oozes and foams out all over the place. 

The front of the cab had a chunk out of it, so I had to use Bondo to fill it. I've used it on my house before (to replace some rotten wood), and it works great. The trick is to build it up, for deeper holes. I built a dam, with Saran Wrap to minimize sticking:


After sanding, I've got a nice 90 degree edge. It's a bit rough, but only about 1/2" will be showing. The rest will be covered by the front panel and T-molding.


I routed out the groove for the T-molding with my dremel, using a cutoff disc: 


Although I wore a dust mask for most of the work, I didn't when I used the Dremel. I inhaled some of the dust from the air, and immediately regretted it. I think I'm still feeling it in my lungs now, 2 weeks later.

Anyway, the repair came out well. I still need to paint the interior, but here's a picture after a quick coat of spray paint:


I'm pretty happy with how everything is looking. I just need to glue/screw the front panel in place and Formica the 2 sides, and then I'll be done with the woodworking.